System Refresh
System refresh is nothing but moving the production system data to quality system for testing purpose.
Generally system refresh will be done when the client size is more and we cannot move the production system data to quality system.
Types of system refresh:-
1. Using offline backup
2. Using online backup
Procedure:-
Source system (Production)
1. Take the screenshots of important T-code
Ex: SCC4, SM58, ST06, SM36, SM37 and the clients specified t-cods.
2. Export client settings – Table T000
3. Printer settings – Table TSP03 and TSP03C
OR
In SPAD t-code we can export or import and delete the configuration
4. RFC Destination – Table RFCDES
Note: - For all the above we have to create the DUMY transport request in t-code SE01.
5. Apart from this we also take the backup of user master record. For this we will export SAP_USR profile in SCC8 t-code.
6. For all the transport requests we have to take down the transport number.
7. Take the clean offline backup (Will be done by backup team)
8. Generate the control file using the command
Alter database backup controlfile to trace
File will be stored in path- oracle/SID/saptrace/usetrace
9. Edit the control file as mentioned below
a. Delete above startup nomount
b. Delete below character set UTFS ;
c. Replace Reuse to SET – Will change Source SID to Target SID.
d. Replace No Resetlog to Resetlog – Will change the log sequence of offline redolog files
e. Replace Archiving to No Archiving – Will avoid creating log files while starting the system
10. Save the control file as .sql or .trc.
Target system (Quality)
1. Delete all contents inside
Sapdata1, sapdata2 to sapdataN, origlog A, origlogB, MirrorlogA, MirrorlogB, saptrace, sapreorg, sapcheck
Command to delete – rm –rf sapdata*
2. Ask backup team to restore the source system backup to target system
Note: If we have root access no problem, if it is not there UNIX team will change root permission.
Command is chown –r
Change the permission inside root
Command – chown –r datafile name
3. Run the script – DB will come to nomount state
4. Then recover the database using the command
Recover database using controlfile untill cancel
5. Execute command
Alter database open resetlog – It will reset redolog sequence number
6. Then execute command – shutdown immidate
7. Execute startup – will start oracle
8. Change the OPS$ password – Through BRTOOLS – BRCONNECT – 8, 4
9. Make background process Zero
Rdisp/wp_no_btc=0
10. Startup – Will start SAP
Post activity:
1. Import RFC definition, client settings, printer settings, Delete and configure SMQ1 and SMQ2
2. Change the background parameter
3. Restart the system
If we are using online backup then we have do below mentioned steps.
1. Perform point-in recovery
2. To do point-in recovery we have to copy the orccrch directory from source system to target system.
Command - Recover database using controlfile untill time and date.
After refresh if the system is not starting do the below steps.
1. Check R/3 trans is working or not
Command- R3trans –d – It will check the connection between SAP and DB
2. Delete source system OPS$ password
3. Change OPS$ password through BRCONNECT option 8, 4
Note: SQL file character will be changed in init.ora file
Path: oracle/SID/102_64/dbs/init.ora
oracle/SID/102_64/dbs/init.sap
How to view database parameters at SAP level
How to view database active parameters at SAP level ?
Goto transaction DB02 and navigate to Additional Functions -> Database parameters as shown below :
Click on Active parameters tab to view active database parameters
How to view SPFILE parameters at SAP level ?
Click on SPFILE tab to view SPFILE parameters
How to view database Parameters history at SAP level ?
Click on parameters history tab to view the parameters that are changed in the recent past.
In the above screen click on Show parameters history. It displays window as below
Provide the date from which you would like to view the database parameter changes.
And then click on tick mark to view the database parameter changes from the selected date.
How to export the database parameters to an excel sheet ?
Click on export button (highlighted below) and select table as the output as shown in below screen and the parameters can be exported to an excel or word as per the selection by you.
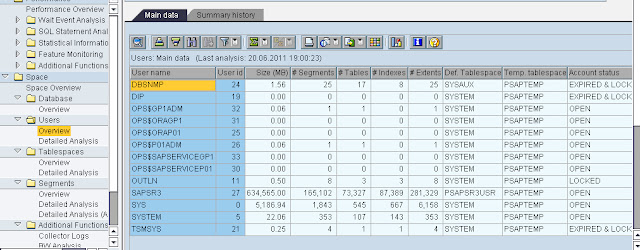
How to check database, tablespace sizes in SAP
How to check the database size ?
Goto transaction DB02 and navigate to Space -> Space overview to view
- Database name
- Database system
- Size
- Free size
- Used percentage
- Number of database users
- Number of tablespaces
- Number of tables and size
- Number of indexes and size
In DB02, navigate to Space -> Space overview to find all the above mentioned details

How to Extend Tablespace with SAP BRTOOLS
Login to your SAP R/3 DB instance Windows using [sid]adm or ora<SID> user. Open yourcommand prompt.
Type BRTOOLS to enter BRTOOLS menu.
2. Select option 2 – Space Management
BR0280I BRTOOLS time stamp: 2011-03-24 03.32.13 |
BR0656I Choice menu 1 - please make a selection |
------------------------------------------------------------------------------- |
4 - Backup and database copy |
6 - Check and verification |
Standard keys: c - cont, b - back, s - stop, r - refr, h - help |
------------------------------------------------------------------------------- |
BR0662I Enter your choice: |
BR0280I BRTOOLS time stamp: 2011-03-24 03.32.59 |
3. Select option 1 = Extend tablespace
BR0280I BRTOOLS time stamp: 2011-03-24 03.32.59 |
BR0656I Choice menu 5 - please make a selection |
------------------------------------------------------------------------------- |
Database space management |
7 - Additional space functions |
Standard keys: c - cont, b - back, s - stop, r - refr, h - help |
------------------------------------------------------------------------------- |
BR0662I Enter your choice: |
BR0280I BRTOOLS time stamp: 2011-03-24 03.33.12 |
4. Select 3 to enter the Tablespace name.
BR0280I BRTOOLS time stamp: 2011-03-24 03.33.12 |
BR0657I Input menu 81 - please check/enter input values |
------------------------------------------------------------------------------- |
BRSPACE options for tablespace extension |
1 - BRSPACE profile (profile) ...... [init<SID>.sap] |
2 - Database user/password (user) .. [/] |
3 ~ Tablespace name (tablespace) ... [] |
4 - Confirmation mode (confirm) .... [yes] |
5 - Scrolling line count (scroll) .. [20] |
6 - Message language (language) .... [E] |
7 - BRSPACE command line (command) . [-p init<SID>.sap -s 20 -l E -f tsextend] |
Standard keys: c - cont, b - back, s - stop, r - refr, h - help |
------------------------------------------------------------------------------- |
BR0662I Enter your choice: |
BR0280I BRTOOLS time stamp: 2011-03-24 03.34.25 |
BR0280I BRTOOLS time stamp: 2011-03-24 03.34.25 |
BR0681I Enter string value for "tablespace" []: |
5. Verify the tablespace name.
BR0280I BRTOOLS time stamp: 2011-03-24 03.34.25 |
BR0280I BRTOOLS time stamp: 2011-03-24 03.34.25 |
BR0681I Enter string value for "tablespace" []: |
BR0280I BRTOOLS time stamp: 2011-03-24 03.35.10 |
BR0683I New value for "tablespace": 'PSAPSR3' |
BR0280I BRTOOLS time stamp: 2011-03-24 03.35.10 |
BR0657I Input menu 81 - please check/enter input values |
------------------------------------------------------------------------------- |
BRSPACE options for tablespace extension |
1 - BRSPACE profile (profile) ...... [init<SID>.sap] |
2 - Database user/password (user) .. [/] |
3 ~ Tablespace name (tablespace) ... [PSAPSR3] |
4 - Confirmation mode (confirm) .... [yes] |
5 - Scrolling line count (scroll) .. [20] |
6 - Message language (language) .... [E] |
7 - BRSPACE command line (command) . |
[-p init<SID>.sap -s 20 -l E -f tsextend -t PSAPSR3] |
Standard keys: c - cont, b - back, s - stop, r - refr, h - help |
------------------------------------------------------------------------------- |
BR0662I Enter your choice: |
6. Press ‘c’ to continue.
BR0280I BRTOOLS time stamp: 2011-03-24 03.35.48 |
BR0259I Program execution will be continued... |
BR0291I BRSPACE will be started with options |
'-p init<SID>.sap -s 20 -l E -f tsextend -t PSAPSR3' |
BR0280I BRTOOLS time stamp: 2011-03-24 03.35.48 |
BR0670I Enter 'c[ont]' to continue, 'b[ack]' to go back, 's[top]' to abort: |
7. At this point, you will see the details of last datafile added and the new datafile to be add. You can change the file size or the storage location. If nothings to change, type ‘c’ to continue
BR0280I BRTOOLS time stamp: 2011-03-24 03.36.12 |
BR0259I Program execution will be continued... |
############################################################################### |
BR1001I BRSPACE 7.00 (32) |
BR1002I Start of BRSPACE processing: sefmufom.tse 2011-03-24 03.36.12 |
BR0484I BRSPACE log file: /oracle/<SID>/sapreorg/sefmufom.tse |
BR0280I BRSPACE time stamp: 2011-03-24 03.36.13 |
BR1009I Name of database instance: <SID> |
BR1010I BRSPACE action ID: sefmufom |
BR1011I BRSPACE function ID: tse |
BR1012I BRSPACE function: tsextend |
BR0280I BRSPACE time stamp: 2011-03-24 03.36.13 |
BR0657I Input menu 303 - please check/enter input values |
------------------------------------------------------------------------------- |
Options for extension of tablespace PSAPSR3 (1. file) |
1 * Last added file name (lastfile) ....... |
[/oracle/<SID>/sapdata4/sr3_20/sr3.data20] |
2 * Last added file size in MB (lastsize) . [2160] |
3 - New file to be added (file) ........... |
[/oracle/<SID>/sapdata4/sr3_21/sr3.data21] |
4 ~ Raw disk / link target (rawlink) ...... [] |
5 - Size of the new file in MB (size) ..... [2160] |
6 - File autoextend mode (autoextend) ..... [yes] |
7 - Maximum file size in MB (maxsize) ..... [10000] |
8 - File increment size in MB (incrsize) .. [20] |
9 - SQL command (command) ................. [alter tablespace PSAPSR3 add datafile |
'/oracle/<SID>/sapdata4/sr3_21/sr3.data21'size 2160M autoextend on next 20M maxsize 10000M] |
Standard keys: c - cont, b - back, s - stop, r - refr, h - help |
------------------------------------------------------------------------------- |
BR0662I Enter your choice: |
BR0280I BRSPACE time stamp: 2011-03-24 03.39.30 |
BR0670I Enter 'c[ont]' to continue, 'b[ack]' to go back, 's[top]' to abort: |
BR0280I BRSPACE time stamp: 2011-03-24 03.40.06 |
BR0259I Program execution will be continued... |
8. Type ‘y’ to add one more datafile or ‘n’ / ‘c’ to continue.
BR0280I BRSPACE time stamp: 2011-03-24 03.40.06 |
BR1091I Next data file can be specified now |
BR0675I Do you want to perform this action? |
BR0676I Enter 'y[es]' to perform the action, 'n[o]/c[ont]' to skip it, 's[top]'to abort: |
BR0280I BRSPACE time stamp: 2011-03-24 03.41.25 |
BR0678I The action will be skipped... |
BR0259I Program execution will be continued... |
9. Wait the process till done
BR0280I BRSPACE time stamp: 2011-03-24 03.41.25 |
BR0370I Directory /oracle/<SID>/sapreorg/sefmufom created |
BR0280I BRSPACE time stamp: 2011-03-24 03.41.26 |
BR0319I Control file copy created: |
/oracle/<SID>/sapreorg/sefmufom/cntrlTR3.old 13844480 |
BR0280I BRSPACE time stamp: 2011-03-24 03.41.26 |
BR0370I Directory /oracle/<SID>/sapdata4/sr3_21 created |
BR0370I Directory /oracle/<SID>/sapdata4/sr3_22 created |
BR0280I BRSPACE time stamp: 2011-03-24 03.41.26 |
BR1088I Extending tablespace PSAPSR3... |
10. Tablespace PSAPSR3 extended successfully.
BR0280I BRSPACE time stamp: 2011-03-24 03.44.27 |
BR1016I SQL statement 'alter tablespace PSAPSR3 add datafile |
'/oracle/<SID>/sapdata4/sr3_21/sr3.data21'size 2160M autoextend on next 20M maxsize 10000M, |
'/oracle/<SID>/sapdata4/sr3_22/sr3.data22'size 2160M autoextend on next 20M maxsize 10000M' executed successfully |
BR1051I Tablespace PSAPSR3 extended successfully with files: |
/oracle/<SID>/sapdata4/sr3_21/sr3.data21 2160M |
11. To verify, go to transaction code DB02
White Paper: Oracle Database Administration
TABLE OF CONTENTS OVERVIEW
BR*TOOLS FOR ORACLE DBA ,
SPACE MANAGEMENT
,Analyses,
Table-space Management.,
Reorganization,
Segment Management,
Functions,
DATABASE SYSTEM CHECK
,Functions.,
UPDATE STATISTICS ,
Functions.,
BACKING UP,
RESTORING,
AND RECOVERING THE DATA.,
Functions.
,COMPUTING CENTER MANAGEMENT SYSTEM ,
ADDITIONAL INFORMATION
,Library ,
Notes
OVERVIEW
The database server plays a key role in the SAP server technology. The amount of work involved in managing the Oracle database largely depends on the size and the workload. SAP supplies several database administration tools, BR*Tools, in the standard SAP system package, helping you to manage your Oracle database more easily. You can manage your Oracle database using the following BR*Tools for database administration (DBA): BRSPACE Database startup and shutdown, alter database parameters, recreate database, tablespace management, space monitoring and analyses, alter and move data files, table reorganization, index rebuild, export and import, manage database statistics, manage flashback database, manage online redo log, manage data encryption BRCONNECT Update statistics, database system check, adapt next extents, clean up old logs and traces, and other additional functions BRBACKUP, BRARCHIVE Backup and verification of database and offline redo log files BRRECOVER Database recovery and restore, as well as disaster recovery
FEATURES OF BR*TOOLS FOR ORACLE DBA
BR*Tools feature several user interfaces, such as a command line and an ASCII user interface with menus. You can also execute some functions using the graphical user interface BRGUI and the Computing Center Management System (CCMS). These tools make database administration considerably easier. BR*Tools: Guide you through all tasks, proposing default values and issuing warnings Log all administrative operations in file system and database logs, detailed logs for individual DBA tasks, and the main log for actions affecting database structure Follow SAP norms and recommendations (for example, for tablespace extension) Perform security checks before starting an operation Monitor operations and evaluate the various error messages Execute the entire process required (for example, BRRECOVER automatically performs all steps for recovering a database after a media error) Let database administrators without in-depth Oracle knowledge perform complex operations such as reorganization Provide an interface to external backup tools using the standard BACKINT interface Identify dependencies using the logs (for example, if the required backup does not exist, BRRECOVER does not perform a recovery) Are integrated into the Computing Center Management System (CCMS) Conform to SAP’s ABAP Dictionary Support Oracle databases on raw devices Support Oracle Automatic Storage Management (ASM) Support Oracle Standby configurations Support Oracle Recovery Manager (RMAN) Support Oracle Real Application Cluster (RAC) Support Oracle database appliances like Oracle Exadata Database Machine
SPACE MANAGEMENT
The Oracle database is installed in file systems, on raw devices, or in Oracle ASM with the SAP system. Database space management with BRSPACE provides essential functions for: Organization of the database files (number, assignment to tablespaces, distribution on disks, file system, raw device, links to raw devices, ASM disk groups) Monitoring logical objects (tables or indexes) in individual tablespaces and checking free space in tablespaces Monitoring storage space allocation of individual logical objects (extents or blocks), extent allocation to an object, the fill level of segments, and so on If storage problems occur, you can use BRSPACE to solve them by extending a tablespace (that is, increasing the physical storage space allocated to the tablespace) or by performing a reorganization (that is, redistributing existing free space and allocated space). Analyses BRSPACE provides several options that help to identify and analyze storage problems in advance. Some options let you modify storage parameters automatically to prevent storage problems arising. In this way, for example, you can considerably reduce the need to reorganize the database. Tablespace Management When BRSPACE creates new data files, it follows SAP naming conventions and take free disk space into account. BRSPACE determines and displays information about free space on disk volumes and raw disks. Therefore, you can easily and quickly extend tablespaces. Reorganization During a reorganization, the database system can be used for production operation or for all other online transaction processing (OLTP) applications. However, the reorganization puts additional load on the system and temporarily doubles the space required for reorganized tables. This is why we recommend you to avoid reorganization if possible, or to speed it up, if it becomes necessary. The reasons why you might need to reorganize the database are: Internal fragmentation: fragmentation of table or index data within a block or chaining of data over several blocks External fragmentation: fragmentation of the extents of a logical object and of the free space within a tablespace, maximum number of extents for an object reached You want to transform dictionary managed into locally managed tablespaces. You want to move certain large and heavily used tables into separate tablespaces. You want to convert BasicFile LOBs to SecureFile LOBs You want to compress tables, indexes, SecureFile LOBs There are fragmented tables or indexes in dictionary managed tablespaces that you are still using. You can identify these by using the database system check. The aim of reorganization is to speed up data access and to use available space more efficiently. The Oracle package DBMS_REDEFINITION is used for the online reorganization process that is executed by BRSPACE as a series of steps. The SQL command ALTER TABLE MOVE is used for offline reorganization. The tables are locked during this procedure. You can modify certain table or index attributes during the reorganization procedure.
Segment Management
You can use BRSPACE to change certain attributes of tables and indexes. You can use BRCONNECT to adapt storage attributes of database objects such as tables and indexes. Functions Displaying disk usage Displaying fragmentation (free space and allocated space) and degree to which tablespaces are filled Computing and displaying database statistics for tables and indexes (individually or for each tablespace) Extending tablespaces Creating and dropping tablespaces Renaming tablespaces and their data files Moving and renaming data files Reorganization (single table and its index, list of tables and indexes, or tablespace), including changes to storage parameters Moving tables and indexes to other tablespaces during reorganization or rebuild Rebuilding online indexes Shrinking online tables and indexes Using Oracle export/import for data transfer
DATABASE SYSTEM CHECK
We recommend you to regularly run the database system check in order to spot problems early. The database system check with BRCONNECT is also available from CCMS. We recommend you to perform the system check daily, using the automation in the DBA Planning Calendar in transaction DBACOCKPIT to execute brconnect -f check. You then display the check results in the CCMS alert monitor and decide whether to implement any recommendations. Functions Checking space (that is, free space and fragmentation) Checking the results of DBA operations with BR*Tools Monitoring Oracle alert messages Checking Oracle profile parameters Checking physical consistency (that is, availability of data files, control files, and redo log files) Checking missing optimizer statistics Checking specific problem situations based upon SAP’s experience in managing databases Controlling all system checks by one single customizing transaction (for example, thresholds, repeatability periods, error descriptions and corrective actions, Oracle error message checks, and Oracle profile parameters can be added)
UPDATE STATISTICS
The Oracle Cost-Based Optimizer (CBO) is activated as standard and is supported by BRCONNECT. The CBO optimizes data access by gathering database statistics, which it obtains by analyzing table size and data distribution. You can use CCMS to automatically set up the statistics control table, DBSTATC, as well as to check and update the CBO statistics. The result is improved database performance. Functions Displaying information about existing statistics Detecting tables that need updated statistics Creating missing statistics for tables and indexes Displaying alert messages for missing statistics for tables and indexes (see “Database System Check” above) Controlling the update procedure by editing the control table DBSTATC Managing table statistics (version management, export/import)
BACKING UP, RESTORING, AND RECOVERING THE DATA
As shown in the graphic below, BRBACKUP backs up the database objects (data files, control files, and online redo log files) and BRARCHIVE backs up the offline redo log files. You can perform a restore and recover with the SAP tools BRRESTORE and BRRECOVER. BRRESTORE also allows parallel processing (like BRBACKUP). You can call all these tools from the BRGUI or BRTOOLS menu. Control files Data files Online redo log files Offline redo log files Backup Media Restore and Recovery Detail and summary log Detail and summary log BRBACKUP BRRESTORE BRARCHIVE BRRECOVER Detail and summary log Data files Online redo log files Offline redo log files Control files Oracle Database BRBACKUP, BRARCHIVE, and BRRESTORE provide an open interface, BACKINT, enabling you to use non-SAP backup tools. The official name of this interface is BC-BRI, and it is certified by SAP. The BRRECOVER menu options for restore and recovery are specially designed for ease of use. BRRECOVER provides support in the following important situations: Media error in several files, for example, because of a disk failure. The database is fully recovered up to the time of the media error. Restoring the entire database or some tablespaces to perform a point-in-time recovery or to reset the database to a previous state Disaster recovery BRRECOVER evaluates the backup logs and the summary log to decide whether the chosen recovery can be performed using the selected backups. For example, it determines whether any actions have occurred between the time of the backup and the end time of the selected recovery (point in time) that would prevent a successful recovery. If BRRECOVER cannot perform a recovery, it rejects the backup selected or the recovery procedure specified.

BRRECOVER can only recover data automatically if BRBACKUP and BRARCHIVE or the BACKINT interface were used for the backup. In this respect, the SAP tools BRBACKUP, BRARCHIVE, BRRESTORE, and BRRECOVER function as an integrated solution.
Functions
BRBACKUP: database backup (parallel, restartable, database status is monitored) BRARCHIVE: archiving of offline redo log files BRRESTORE: restore of database and offline redo log files (parallel, restartable) BRRECOVER: complete database recovery, point-in-time recovery, and disaster recovery Backup media management Validity check of all objects in the database (online redo log files, control files, data files) Automatic restore of all required objects (tape request) Support in various situations such as disk failure, point-in-time recovery, resetting the database to a previous state Support for special database configurations such as standby database. Backup from disk backups to tape (two-step backup) Split-mirror disk backup Standby database backup Completion of partial backups Robot control interface for automatic tape mounting BACKINT interface to commercial backup tools Support of Oracle Recovery Manager (RMAN) for incremental backups Support for Oracle Real Application Cluster (RAC) Support for Oracle Automatic Storage Management (ASM) Support for Oracle appliances such as the Oracle Exadata Database Machine
SAP Oracle10g installation
Goto correct path :/oracle/stage/102_64/database/SAPthen execute script./RUNSINTALLER
Accept all defaults
Click Next
Click ‘YES’ to proceed. Ignore warning.
Click Install to proceed.
Wait till completion.
Execute the script (as root) in a separate terminal window.
Run second script (as root) and accept defaults.Now return to GUI installer and click ‘OK’
Click ‘Exit’ to complete installation.
Goto path:/backup2/software/SAPCD/ORACLE/PATCH/SOLARIS64/Disk1To run Patch installation call
./runInstaller
Accept defaults
Click Next when complete
Make sure all oracle processes(e.g listener is stopped beforehand)
Ignore and click ‘Next’
Make sure correct oracle home directory. Then click ‘Install’
Wait till 100% completion.
Run script (see next screen) and then come back and click ‘Ok’
Execute script as root
Patch installation completed successfully.


No comments:
Post a Comment